Sew Dots Take 1

If you sew, and if you use Instagram or Twitter, you must know about the #SewDots campaign.  Sew Dots was brought to us by the wonderful Rosie Martin, author of the recently published No Patterns Needed.  When she’s not sewing or writing books about sewing, Rosie does fantastic work for the RNIB – the Royal National Institute of Blind People – helping people with visual impairments use modern technologies, such as mobile phones.  Sew Dots came as an extension of the RNIB’s Wear Dots Raise Lots, a campaign aimed at highlighting the impact of Braille, and Rosie, because she’s brilliant, thought she could rally up fellow dressmakers to try to raise even more awareness.  The idea was to sew something dotty (dots like Braille), share your creation/s on Twitter or Instagram and donate £5 to Rosie’s Just Giving page.  I sewed, and I donated, so let me share my first Sew Dots project with you.

The fabric: a white Swiss dot I picked up on eBay.  I liked the idea of Swiss dot because I wanted my projects to have 3D elements.  The dots on this fabric are perfectly reminiscent of Braille.

The pattern: I’m sure you’ve seen the latest release from Lisa Comfort at Sew Over It.  My Capsule Wardrobe: City Break has taken the sewing world by storm.  And rightfully so, everything in that e-book is beautiful!  This is my first (of many, I’m sure!) make from it – the Alex shirt.

Modifications: just two.  I used the tab from the Tilly and the Buttons Bettine pattern instead of the one provided, as the Bettine tab was a bit wider and less fiddly.  Because I’m lazy – there, I said it.  Also because I’m lazy, I was very naughty and didn’t bother with the buttonholes.  The shirt is so loose fitting that it slips over my head just fine.  In fact, I may even go down a size for my next Alex Shirt.

The cost: the fabric was £6.99 per metre.  I bought three metres, but didn’t use it all.  I used self-cover buttons, which were £2.50.  In total, that’s about £23.50.

I think Rosie has struck gold with this idea, and I’m really hoping it sticks around in future years.  This is something that means a lot to me.  I don’t think I’ve mentioned before that my father is blind.  He uses the services provided by the RNIB extensively, especially their talking book and Braille libraries.  I know he would be lost without books.  The work the RNIB does really is invaluable, and I’m a fan of any campaigns that support their work.

Vintage Vogue 9126 Pattern Hack

My blog has been shamefully neglected recently, but I have something extra exciting to share with you today – my first magazine feature!  I was asked months ago (it’s been torture keeping this to myself!) whether I’d like to be involved with a pattern hacking feature for Sew Style Vintage.  You know I love pattern hacking and refashioning and the like, so I jumped at the chance.

I won’t into my usual detail on here, as it’s all in the feature, but I wanted to share this exciting news and some photos of my finished hack 🙂  I was very kindly sent the Vogue 9126 pattern and a lovely viscose fabric with a vintage rose print.  The feature also shows off a beautiful hack by Abi over at Crafty Pinup – how lovely is her 50s frock?

The magazine is available in WH Smith stores at the moment, or you can buy a copy here if you like.  It’s a very pretty magazine, definitely one to keep, and it includes both Vogue patterns used by myself and Abi, as well as the pattern for the blue spotty dress you can see on the cover – 20 projects in total, so it’s well worth its £9.99 price tag.

Thank you so much to Sew Style Vintage for asking me to take part and printing my hack!  It’s been a real pleasure, and I’m so happy to be included in such a beautiful publication 🙂

#therefashioners2016

My #therefashioners2016 project is finally finished 🙂 To tell you the truth, I finished it weeks ago – it’s just been waiting for its hem.  When I tried to hem it the first time my machine had a strop, so I threw it to one side for a while.

For those of you who don’t know, the Refashioners is the brainchild of Portia Lawrie from the Makery.  Each year, Portia chooses a garment and encourages the sewing community to transform said garment into something else.  Last year it was a button down shirt, and this year it’s the turn of jeans.

My ’70s style, paneled mini is by far the most boring transformation I’ve seen this year, but I knew I would wear it, and for me that’s the whole point of refashioning.  What’s the point in making something so crazy you’ll never wear it?  Anyway, even though it isn’t the most exciting refashion you’ll see, there was one thing about it that I found very exciting – flat felled seams.  I’ve never done them before, and I don’t think I’ve had a bad first go at it!  There are a couple of wobbly bits, but not so wobbly that I felt the need to unpick.  I’ve paired it up here with my dachshund Agnes top.

The fabric: cut from a pair of size 16 jeans found in a charity shop.

The pattern: the paneled skirt from the Simple Sew Chelsea collection, which came free with Love Sewing magazine a couple of months ago.  I don’t think it’s available to buy separately yet.

Modifications: my jeans weren’t wide enough to cut the back panel in one piece, so I ended up adding seam allowance and cutting two, giving me a centre back seam and an extra panel.  As I mentioned before, I had trouble with the hem – my sewing machine could not cope with a double turned hem on such thick denim, especially where the flat felled seams were involved.  In the end, I just overlocked the bottom and did a single turned hem.  Even that wasn’t good enough for me sewing machine – I have a couple of skipped stitches and it was making some truly horrendous noises.  I’m actually quite worried that I won’t be able to make jeans on my machine…

The cost: the jeans were £2.50 and I spent a couple of quid on some topstitching thread.  The buttons were from my stash.  With the cost of the magazine the pattern came with, I’d say about £10.

Thanks so much to Portia for hosting this again – I can’t wait for next year.

The Seamstress Tag

I have something a little different today — the Seamstress Tag! The Seamstress Tag was thought up by Hollie, over at Hollie Sews, and started out in the vlog-osphere, but I’ve decided to hop on the bandwagon, as it’s a rather marvellous idea. Thanks, Hollie! It’s a series of twelve questions, mostly about sewing — let’s get straight to it.

1. Who are you?
My name is Victoria, and I live in Durham, England, where it’s cold and wet most of the time so there’s no such thing as a seasonal wardrobe for me. I live with my other half, Anthony, and our very energetic dog, Riley. When I’m not sewing, I’m a librarian.

2. When and why did you start sewing?
I started sewing in late April/early May of 2014, so I’ve been at it for around two and a half years now (though I still feel like I’m only just starting out sometimes!). I signed up for a ‘Dressmaking for Beginners’ course with a couple of friends — we learned all the skills needed to make a skirt — and I’ve never looked back. We went on to do the continuations course and ‘advanced’ course, which was really more of a sewing bee. I could not have learned to sew without the help of our wonderful tutors, Dan and Rory, who now run the Centre Front Studio in Newcastle. I can’t thank them enough. If I’d tried to teach myself it would have been a disaster, I’m sure. As for why I started sewing — well, I’ve always liked vintage clothes and I’ve always been crafty, so I thought it was about time I combined the two and made my own clothes. And now I’m well on my way to having a handmade wardrobe!

3. What is your favourite or proudest make?
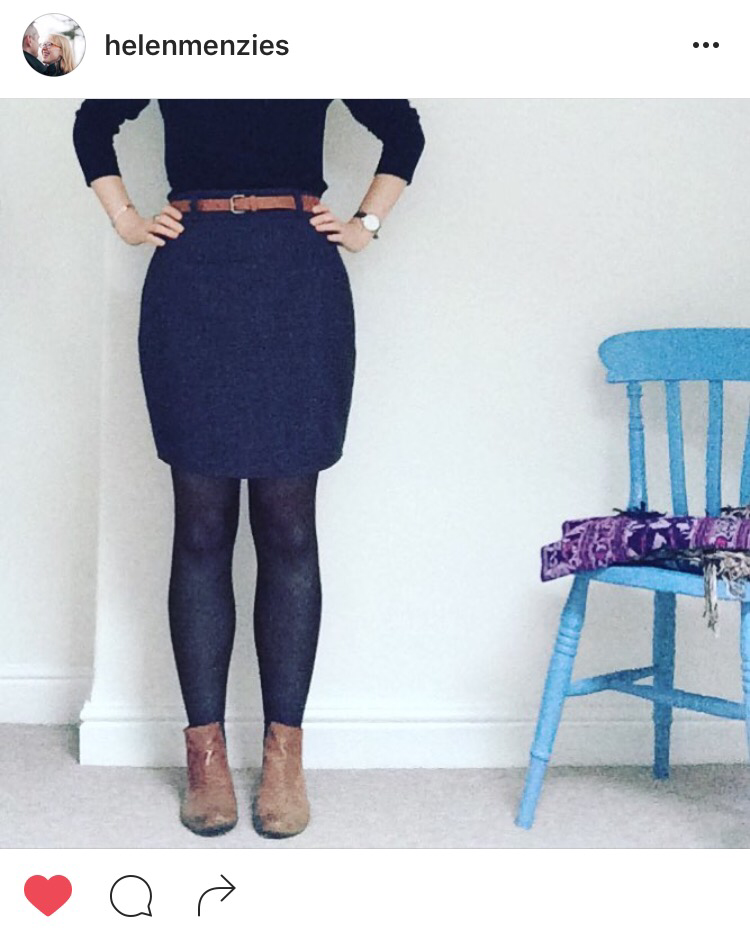
Can I please choose one for each? They’re both Tilly and the Buttons patterns. My favourite make, the one I wear a lot on an every day basis, is my second Bettine dress. Love the fabric, love the print, love the fit — I just love it. My proudest make is my Francoise dress, which was a runner up in Tilly’s #SewingFrancoise contest. I had only been sewing for a few months, and it was the first project that made me think I might actually be alright at this dressmaking lark.

4. What is your most disastrous make?
It has to be the New Look 6446 jumpsuit, which I talked about extensively in this blog post. There really wasn’t much that was right with it. I’m not too disheartened though — I really like the pattern, so I’m going to toile it next time and work through all the crotch issues.

5. Where is your favourite place to go fabric shopping?
Well, I live in the back end of nowhere, so I don’t really have a local shop I can go to. I do most of my fabric shopping online. My favourites are Sew Over It, Fabric Godmother, Plush Addict, the Textile Centre, and Girl Charlee UK. I will need some jersey soon (I’m planning about fifty Molly tops/dresses from Lisa Comfort’s My Capsule Wardrobe: City Break) and I guarantee that will be purchased from Girl Charlee.

6. What is your most used pattern?
Thanks to One Week One Pattern 2016, Tilly’s Bettine is my most used pattern (see my recent blog posts). However, as soon as I have perfected Lilou (from Love at First Stitch), I suspect that will take over.

7. Your most dreaded sewing task is…?
I hate unpicking (obviously), trimming seam allowances, clipping corners and curves, or anything else that can result in holes in your fabric if you make any false moves. It’s the most dreaded fear, that I might hike my fabric in the wrong place, so I hate all of those tasks, even though it very rarely goes wrong. Please don’t let me have just jinxed myself!

8. And your favourite sewing task?
It sounds really sad, but my favourite part is giving everything a final press at the end. That’s right — that final iron. Not only does it mean the project is finished (yay!), but it makes the garment look all shiny and new! Pressing makes such a huge difference, from start to finish — it’s tempting to skip all that ironing, but your garment would suffer for it.

9. What is your favourite sewing entertainment?
I like to have sound in the background when I sew, whether it’s a box set, an audiobook, or music. More recently I’ve been favouring box sets (or Netflix) over anything else though. Highlights include Once Upon A Time, Brooklyn Nine-Nine and Emma. An eclectic mix.

10. Printed or PDF?
As a general rule, if there’s a printed pattern available that’s what I’ll choose to buy. They’re just nice to have. I do by the occasional PDF, but usually only if there’s no printed option. I have so many fit issues that I need to trace off all of my patterns anyway, so when I have to stick fifty sheets of paper together on top of tracing it does me in. Printed all the way.

11. What sewing machine do you use?
I have the Brother RL417. It’s a very basic machine but it serves me quite well. I think it might need a service because it’s started making the occasional funny noise. I’ve just started to crave a new, more advanced/sturdy machine. If there’s one fault with the one I already have, it’s that it really doesn’t cope with thicker fabrics very well. For instance, I’ve just hemmed a denim skirt with flat felled seams and it was a nightmare. It made horrible noises and kept getting stuck and skipped stitches — stress! I’d like a machine that can cope with all fabrics. I also have an overlocker — a Singer 14SH754 — which seems to work okay. However, I can’t even pretend that I use it to its full potential. I spent the first six months (at least) ignoring it out of fear, and now I’ve just about taught myself how to thread it up two different ways. That’s all I need for now.

12. Do you have any other hobbies?
Yes! I knit, when I can, especially in winter. I crochet, but rather infrequently. I do the occasional cross stitch, and I dabble in lots of other crafts as well, usually when I’m making gifts. Basically, anything crafty and I’m your girl. I also volunteer with a Brownies unit each week and help out with Guides sometimes. As you can imagine, that involves a plethora of activities.

So that’s my Seamstress Tag! I hope you are enjoying this tag as much as I am, and I hope fellow bloggers will join in. It’s a great way of getting to know everyone ☺️

#OWOP16 – Bettine no. 7

Right, it’s time for some real experimenting now.  A couple of weeks ago, I spotted a hack of Bettine on Instagram that was just the skirt.  It had been re-jigged it somehow so that it had a waistband, and it looked really great.  ‘Who is this genius?’ I hear you saying.  Her name is Helen, and she can be found on Instagram at @helenmenzies – please go check out her makes.  I asked how Helen had done it and she was kind enough to share, so I owe this project entirely to her – it’s not something I would ever have thought to do myself.  Here is Helen’s lovely, sophisticated Bettine skirt.

img_2269

My skirt on the other hand is more on the outrageous side, as you can see.

You’ll have to forgive me for camouflaging in the photos.  Unfortunately everywhere around my house is green.  Well, not unfortunately, usually I don’t mind that at all, but it did make getting photos of this skirt problematic.

The fabric: a slightly outrageous choice, no?  I have a gorgeous brocade-style fabric that I think would be perfect for this skirt, but learning from my disastrous Bettine top hack, I decided not to plunge straight in with the perfect fabric.  Now, this green stuff has been sat in my stash for a while now.  I got it from Resourceful Restoration, a vintage and antiques furniture shop.  Every now and then there’s some fabric up for grabs and I managed to snap up 2.5 metres of this for £20.  I think it’s quite an old fabric, as it’s only 90 centimetres wide.  I was drawn in by the colour and print – I love greens, and I love florals.  The thing about this fabric is that it’s textured.  It has a flocked/velvety/velour feel to it – I guess it was originally some sort of furnishing fabric – so I wasn’t sure what sort of project it would be suited to.  Eventually, I just decided that if it wouldn’t work for a simple skirt it probably wouldn’t work for anything at all.  I decided I’d try for a wearable toile, but I’m not sure how wearable it is.  Thoughts?  Is it too weird?  Anyway,  I do like the shape of the skirt, and this hack has been far more successful than the last one, so I’m going to go ahead and try with my brocade fabric (if I have enough…).

The pattern: a mash up of Bettine and Delphine (even the names sound like they belong together!), both from Tilly and the Buttons.  Delphine is from Tilly’s book, Love at First Stitch (which is brilliant, by the way – highly recommend) and you can see my non-hacked Delphines here.

Modifications: yes, I had to make quite a few.  Firstly, I needed to figure out how to make the two patterns work together and redraft them. Additionally, I added a side zip and a waistband.  I didn’t put pockets in this one – I didn’t think they’d work with the fabric.  I’m going to put a tutorial (of sorts) of this hack at the bottom of this post, so scroll down if you want more detail 🙂

The cost: just the fabric, at £20.  I have some left though, but I’m back to wondering what I could make from it…  I used a zip that was given to me and I already had the thread.

Although I’m unsure on my fabric choice, I’m really happy with how this turned out.  In the right fabric it would be beautiful.  It’s like a tulip-meets-pencil skirt in shape, and I think it would be lovely in woolen fabrics for winter.  We’ve hit September so I’m all over the winter sewing now!

And with this, I come to the end of #OWOP16!  What a great idea One Week One Pattern is – it’s great for showing off a pattern’s versatility and encouraging sewists to be abit more adventurous with hacks.  I’ve loved seeing everyone’s creations, and I’ve added about fifty patterns to my wish list.  I huge thank you to Cinderellis Sews for hosting it this year – it’s been a blast!
How I did it

img_2448

  1. I traced off the front skirt piece of Bettine onto some new tracing paper.
  2. I drew a line 1.5 centimetres down from my Bettine waistline – the waist seam on Bettine is 3 centimetres, and Delphine’s is 1.5, so I needed to even it out somewhere.  This would be my new waistline for Bettine.  I think I could have started further down if I wanted to, as long as the side seams met up somewhere.  Helen’s skirt looks shorter than mine, and I wonder if that’s why – but it could also be that I’m only 5’2″.img_2451
  3. Then I needed to trace off the top part of the Delphine side seam onto my new Bettine piece.  I already had Delphine cut out, so I placed that pattern piece on top of my new Bettine piece, lining the top centre fold corner with the corner of my new waistline.  I traced the Delphine waistline and side seam until it met up with Bettine, as pictured.img_2453
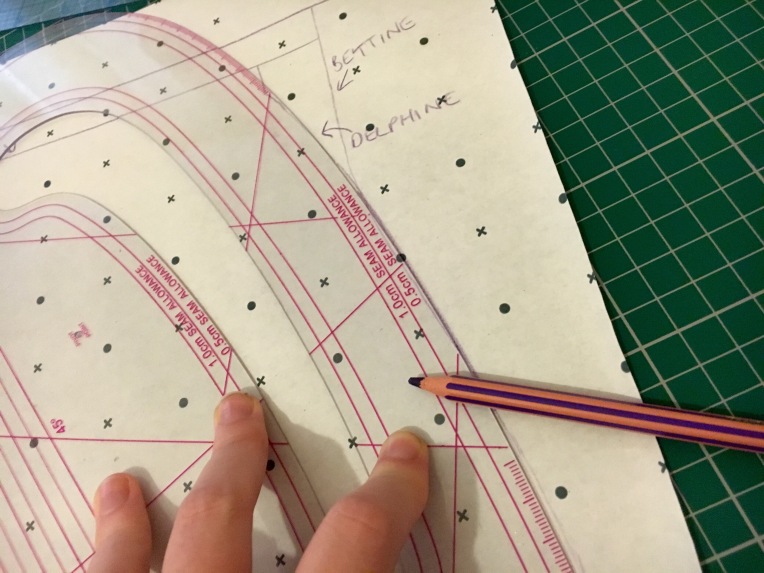
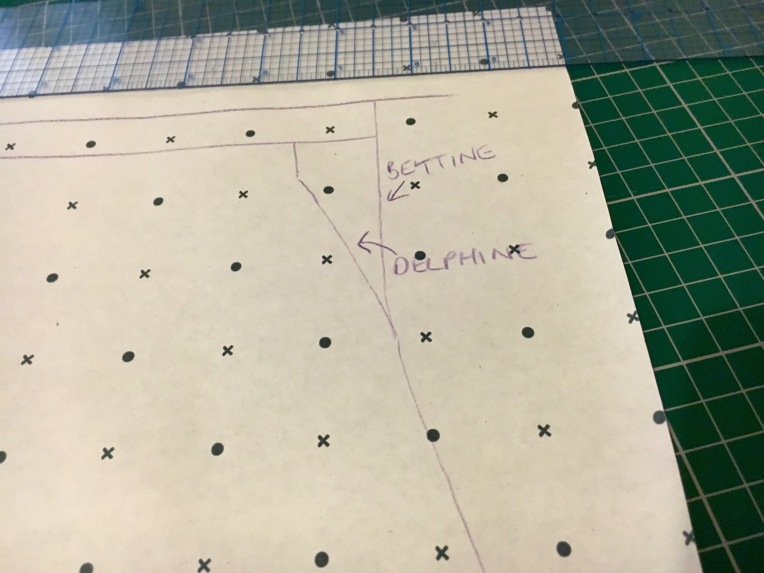
If you have not already cut Delphine, I guess you could place the new Bettine piece over the top of Delphine (1.5 centimetres above the Delphine waistline) and trace it off from underneath, if that makes sense?
  4. I trued up the new curve where the two patterns met with my dressmaking ruler – as you can see from the above picture they met at a slightly funny angle.img_2454
  5. Finally, I cut it out and labelled it properly so I’ll know what the heck it is next time I’m rifling though my Bettine envelope.img_2457

And then I sewed it up using this new pattern piece for both the front and the back and the Delphine front waistband piece.  I mashed up the Delphine and Bettine instructions.  I used the Delphine instructions for the waistband and zip (except that I put the zip in the side instead of the back, because I’d omitted the entire back seam), and I followed the Bettine instructions for the hem.  I think next time I sew this it will be super-quick.  Even with all the technical stuff it only took me a few hours, so next time I’ll whiz through it 😀

#OWOP16 – Bettine no. 6

On to my sixth Bettine, which is sadly a bit of an epic fail 😦  I decided to try a hack, but it hasn’t turned out like I’d hoped.

The fabric: a lovely viscose from the Textile Centre.  They have it in another colour too.  I’m so gutted that this top isn’t as wearable as I’d ideally like because I love the fabric.  I might even buy some more and have another go.

The pattern: an unsuccessful hack of Bettine, from Tilly and the Buttons.

Modifications: this is where it all went wrong.  Firstly, I made the rookie mistake of not checking I had enough fabric to get both the front and back bodice pieces out of it.  Well, in my defense, if the pattern on the fabric wasn’t directional I would have had enough, but it was directional and I didn’t check and then all of the pieces didn’t fit.  I ended up having to chop a load of the length off the sleeves.  Then, all the alterations I made to the pattern turned out to be wrong.  I lengthened it – makes sense, right?  I thought that because Bettine is loose fitting that would be enough and I wouldn’t need to grade it out at the hips.  Wrong.  Unless you have extremely narrow hips (good for you, if you do), you will need to grade this pattern out at the hip.  Now that I’ve had this horrifying realisation (which I only had when I tried the top on for the first time – wah!) it makes perfect sense.  It also means that I wasted copious amounts of time painstakingly hemming the high-low hem I drafted.  Ho-hum.  It’s too snug at my hips is the crux of it, but I’ll probably be able to wear it under skirts.  Silver linings.  And I’ll definitely have another go at this, because I think it could be really good if I ever manage to get it right.

The cost: just the fabric, which cost £3.99.  So at least my epic fail didn’t cost an epic amount of money.

#OWOP16 – Bettine no. 5

I’m combining stash busting with re-fashioning with Bettine number five 🙂

The fabric: I used leftover dachshund jersey from my Agnes top  for the bodice.  I won this fabric in a giveaway hosted by So, Zo… and Girl Charlee UK.  I still love it, it’s so soft and comfy.  I paired it up with fabric from a beautiful, coral corduroy skirt I found in a charity shop.  Always look out for fabrics you like in charity shops even if whatever it is won’t fit you – this skirt was far too big for me, but it had masses of fabric so I knew I’d be able to hack it apart and make something else.

Modifications: yep, a few.  Again, I made all the relevant changes for working with jersey outlined in Tilly’s blog post for the bodice.  The corduroy skirt was panelled, so I ended up having to panel mine.  I have two front pieces and two back pieces, and centre from and centre back seams.  It’s really easy to make your skirt this way – just add seam allowances where the fold lines are on the pattern pieces and cut two front and back pieces, instead of one front and back piece on the fold.  I hope that makes sense.  Once they’re sewn together, you can treat them in exactly the same way you ordinarily would.  The other change I made was to make ‘pocket bags’ because I didn’t have quite enough fabric to get full pockets.  As a result I have half corduroy pockets and half cotton pockets.  Again, to do this, I just split my pockets in half and added seam allowances to each piece.

The pattern: trusty Bettine.

The cost:  I already had everything I needed except the skirt, which cost £3.  Bargain or what?!

#OWOP16 – Bettine no. 4

More stash busting today!  I’m not doing too badly with this de-stashing resolution.  Marking the halfway point of One Week One Pattern 2016, I have my jersey Bettine.

The fabric: a red ditsy floral from Fabric Godmother, which is now out of stock.  It’s a lightweight jersey with a nice drape, so works well for the pattern.

Modifications: the ones Tilly suggests for making a jersey Bettine in this blog post.  You have to swap the neckline facing for a neckband and omit the pockets (the only downside to this dress).  I also decided not to have cuffs or tabs, and simply turned the sleeves under.  As with Bettine number three, I didn’t use zigzag stitch, and it seems to be okay.  No adjustments needed to be made to the size because of the style of the dress – no working out negative ease and all that jazz.  Another perk to not adding pockets is that it made it a super-quick sew.  I think I made the whole thing in no more than four hours.  Plus, I paused for lunch and to watch a couple of vlogs.

The pattern: Tilly and the ButtonsBettine.

The cost: just the cost of the fabric.  I got two metres for £18.  I used less than 1.5 metres for this version though, so the leftovers have gone to my sister 🙂

#OWOP16 – Bettine no. 3

After making two Bettine’s exactly as the pattern suggests I decided it was time for a bit of experimenting – this one is half jersey and half denim.  Not only that, but I’ve done some stash busting too, making this a really cheap sew.

The fabric: leftovers from other projects.  I got the striped jersey from Plush Addict ages ago and it was leftover from my Coco dress, and the lightweight denim was rescued from a disastrous (I mean, disastrous) attempt at a jumpsuit.  I had enough denim left for the front skirt piece, but I had to cut two pieces for the back from the trousers of the jumpsuit.  This means I’ve got a centre back seam, but that’s okay.  I used more fabric from the jumpsuit for contrast cuffs, pocket linings and facings.  How very frugal of me!  It was a bit challenging making the stretchy jersey and denim go together nicely, but with a bit of gentle persuasion I managed it.

The pattern: Tilly and the ButtonsBettine dress.

Modifications: yes, a few.  Tilly outlines various changes you should make when making Bettine from jersey in this blog post.  I followed her instructions for the top half of the dress – for me, it really only meant I had to swap out the neckline facing for a neckband.  I didn’t actually follow some of the usual rules for sewing with jersey, such as using zigzag stitch, because the garment isn’t form fitting and doesn’t need to stretch while you’re wearing it, so I didn’t think it would matter.  It seems to be okay so far – hopefully I won’t live to regret it.

The cost: I was tempted to label this a free project, because the chances of me rescuing the denim from that ghastly jumpsuit were very slim.  However, I did probably use about a metre of denim (maybe slightly more), so I will include that.  It was this denim – £7 per metre from Fabric Time.  I already had everything else though, so it really did only cost me £7.

By the way, I completely forgot to take any photos to document the epic disaster that was the jumpsuit (this jumpsuit), which I’m really angry at myself about.  It’s a lovely pattern, but there were two problems.  Firstly, an incident with my overlocker meant that I put an enormous hole in one of the trouser legs.  I could have cried real tears, let me tell you, but I decided to persevere and try to make a wearable toile, shortening the legs to get rid of the hole and have a shorts-style play suit instead.  However, it didn’t take long for problem number two to become apparent.  To say I had crotch issues would be the understatement of the century.  I’m short, so I would always expect skirts to come up a little long and crotches to sit a little low.  A little low.  However, this particular crotch was sagging about three quarters of the way down my thighs.  I’m not kidding – it was ridiculous.  I do really like it, so I’ll be giving it another go at some point (this time I’ll toile it properly!) and report back.  You live and learn, don’t you?